Earn high interests with Binance Simple Earn and LPT (Livepeer)

Today, I want to provide you with insights into the exciting world of the cryptocurrency exchange, Binance, and show you how you can earn a high Annual Percentage Rate (APR) with Binance Simple Earn and the crypto-coin LPT (Livepeer). Binance is one of the leading cryptocurrency exchanges worldwide, offering a multitude of opportunities to profit from developments in the crypto market. Let’s explore how you can enter the world of passive income with Binance Simple Earn!

LPT (Livepeer) – A Coin with High APR: LPT, the native coin of the Livepeer network, is a promising cryptocurrency that has achieved a high APR (interest rate, see below) in recent months. Livepeer is a decentralized video-streaming network based on the Ethereum blockchain, enabling the efficient transmission of high-quality video content. The Livepeer platform empowers content creators and streamers to reach audiences worldwide.

Binance Simple Earn – Step-by-Step Guide:

Follow this step-by-step guide to set up Simple Earnings on Binance using the example of the Livepeer (LPT) coin:

  1. Register with Binance or log in if you already have an account.
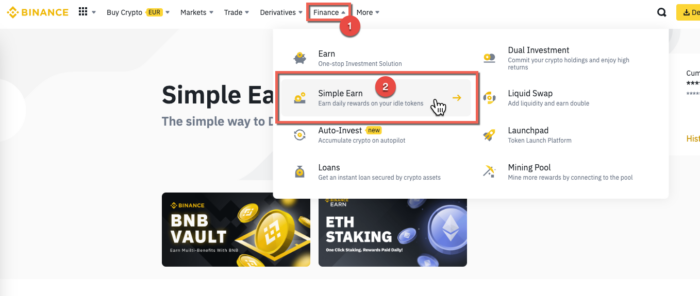
  2. Adding LPT or another Coin: To add LPT (Livepeer) or any other coin of your choice, click on the “Finance” option in the top menu on the website and then select “Simple Earn.” From there, choose LPT from the list of available coins and input the desired amount. I recommend selecting “Flexible” as the investment option.
    How to make money with Binance with ease

    You can generate passive income with Binance via the menu item “Finance” > “Simple Earn”.

  3. Auto-Subscribe Function: The “Auto-Subscribe” function is a convenient feature that allows you to automatically invest in Flexible products. Every day at 02:00 am (UTC) and 04:00 pm (UTC), all the assets in your Spot Wallet will be used for Flexible products. This ensures that you never miss an opportunity to profit from attractive interest rates and allows you to invest continuously.
  4. Viewing Earnings: You can view your earnings through your Binance Wallet. Simply navigate to “Wallet,” then select “Earn,” and finally, click on “Simple Earn” (Flexible). By choosing “Flexible,” you have the flexibility to withdraw your investments at any time.

APR (Annual Percentage Rate) Explained

APR stands for Annual Percentage Rate, and it represents the annual interest or yield that an investment generates, including compound interest. APR is a crucial metric for evaluating the profitability of financial products, such as cryptocurrency investments. The higher the APR, the more returns you can expect within a year.

Calculating Returns for Different Time Periods

To calculate the daily return, we divide the APR by 365 (days). Here are the calculations for 30, 60, 90, and 120 days:

Assuming the APR for LPT is 38%:

Daily Return: 38% / 365 = 0.1041% per day
Return for 30 days: 0.1041% * 30 = 3.123%
Return for 60 days: 0.1041% * 60 = 6.246%
Return for 90 days: 0.1041% * 90 = 9.369%
Return for 120 days: 0.1041% * 120 = 12.492%

With an APR of 38%, you can expect impressive returns on your LPT (Livepeer) investments.

By integrating LPT into Binance Simple Earn, you can contribute your LPT tokens to a growing network while benefiting from attractive interest rates. The Auto-Subscribe function ensures your investment remains up-to-date, enabling you to seize every opportunity for additional earnings.

Conclusion on Binance Simple Earn

With Binance Simple Earn and the LPT (Livepeer) crypto-coin, you can tap into a passive income stream while being part of the future of the video-streaming market. The platform offers a user-friendly interface, and the Auto-Subscribe function makes it easy to increase your income continuously. So, what are you waiting for? Discover the world of cryptocurrencies on Binance and be part of a promising future! Happy earning!

Solving the HTTP 500 / Internal Server Error when moving a WordPress blog between domain providers

Anyone who operates a WordPress blog and switches domain providers may face various challenges. One such challenge is the HTTP 500 / Internal Server Error. In this article, we will present a solution to this problem that occurs when using the Wordfence security plugin and when a user.ini file is located in the root directory of WordPress.

The HTTP 500 / Internal Server Error is a common problem that can occur when moving a WordPress blog from one domain provider to another. When using the Wordfence security plugin, the user.ini file in the root directory of WordPress can lead to this error.

To fix the HTTP 500 / Internal Server Error, you need to open the user.ini file and modify the path to the wordfence-waf.php file. Here are the steps you need to perform:

  1. Open the user.ini file: The user.ini file is located in the root directory of WordPress. Open this file in a text editor.
  2. Find the path to the wordfence-waf.php file: In the user.ini file, you will find a line that contains the path to the wordfence-waf.php file. This path is valid for the old domain provider and needs to be updated to work with the new domain provider.
  3. Update the path to the wordfence-waf.php file: Change the path so that it points to the new directory of the WordPress blog on the new domain provider. Make sure the path is correct and includes the filename “wordfence-waf.php” at the end.
  4. Save the changes: Save the changes in the user.ini file and close the text editor.
  5. Check if the HTTP 500 / Internal Server Error is resolved: Visit your WordPress blog to see if the HTTP 500 error has disappeared. If the path to the wordfence-waf.php file has been correctly updated, the error should no longer occur.

By following these steps, you should be able to quickly fix the HTTP 500 / Internal Server Error and get your WordPress blog up and running smoothly again.

Setting Up Multiple Knight Manager Accounts for Families with Multiple Children

Knight Manager is an exciting and entertaining Alexa Skill game that is very popular among children. If you have multiple children and want each child to have their own Knight Manager account without interfering with each other’s progress, this guide is perfect for you.

We will explain step by step how to create a separate Amazon account for each of your children and link it to the Alexa device.

Step 1: Create an Amazon account for each child

  1. Open the Amazon website (amazon.com (US)) and click on “My Account” in the top right corner.
  2. Choose “Create a new Amazon account” and enter the required information such as name, email address, and password. Use a separate email address for each child.
  3. Repeat this process for each child in your family to create separate Amazon accounts.

Step 2: Log in to the Alexa app (with the child’s own smartphone or a parent’s)

  1. Download the Alexa app from the App Store (iOS: https://apps.apple.com/us/app/amazon-alexa/id944011620) or Google Play Store (Android: https://play.google.com/store/apps/details?id=com.amazon.dee.app) on the respective child’s or parent’s smartphone.
  2. Open the app and log out if you are already logged in. To do this, tap the menu icon (three horizontal lines) in the top left corner, select “Settings” and then “Log Out.”
  3. Now log in with the previously created Amazon account of the child.

Step 3: Set up the Alexa device on the smartphone

  1. Tap the menu icon (three horizontal lines) in the top left corner of the Alexa app and select “Devices.”
  2. Click the plus symbol (+) in the top right corner and follow the instructions to set up your Alexa device and connect it to the child’s Amazon account.

Step 4: Activate Knight Manager Skill

  1. Go to the menu in the Alexa app and select “Skills & Games.”
  2. Search for “Knight Manager” and tap on it to open the skill’s detail page.
  3. Click “Enable for use with Alexa” and follow the instructions to install the skill on the Alexa device.

Repeat steps 2 to 4 for each child who wants to use their own Knight Manager account. Remember to log out after setting up each child and log in with your own Amazon account or that of the next child. This way, each child can play the game independently without affecting the progress of others. Have fun playing Knight Manager with your family!

Critical Mistakes You Must Avoid When Purchasing Prescription Medications Online

Every day, over 20 new illicit pharmacies appear on the internet. Approximately 96 percent of these international internet pharmacies do not comply with applicable legal criteria. Meanwhile, 92 percent of unlawfully operating internet pharmacies do so illegally. If you buy drugs online in a hurry, you risk putting your details in danger.

It’s helpful to know the blunders many buyers make to guarantee you get the proper meds. When buying medication online, there are some pitfalls to avoid. You can buy medicine securely and guarantee it’s the medicine you need by avoiding these blunders. Use these suggestions to begin shopping right away.

1. Purchasing Without Conducting Research

Unless you’re purchasing the same item often or have prior experience with the e-commerce company you’re buying from, anything you buy online takes study. Purchasing products, whether you are given an irresistible deal like “check here for a flash sale on your purchase” by a vendor, without doing any investigation might lead to disastrous effects. Internet rating sites exist exclusively to alert customers to a seller’s lack of professionalism.
If you don’t read reviews or conduct research, you can end up buying from a shady seller who offers you fake goods. Some medical review experts discuss how reading reviews and conducting research may assist you in making informed medical decisions. Always do your homework before purchasing anything online, examine review sites, and exercise caution.

2. Failure to Send a Prescription

Make sure that the – pharmacy asks for a prescription. Don’t buy them there if they don’t ask for a medical recommendation. Otherwise, the pharmacy may send you the incorrect drug. There’s also a chance they’ll deliver counterfeit drugs. They may even deliver prescriptions laced with potentially hazardous fillers. Your health may be jeopardized if you do not obtain the medication you require. Prescription medications should only be purchased online from stores that need a prescription.

3. Not Verifying Credentials

Among the most significant errors, consumers make when purchasing medicine online is forgetting to check for trusted online retailers. How can you know whether an internet pharmacy is legitimate? Take the time to investigate their qualifications. To begin, go to the NABP. Is it true that they are licensed and authorized to work in their chosen field? If not, continue your search. Any internet retailer should be able to disclose information about their qualifications.

If you can’t discover their license and registration information, look for their contact information. You are free to inquire about credentials. The VIPPS seal is also present. If you see this seal on the website of a pharmacy, it implies they’ve completed their license examinations. They’ve most certainly satisfied all of the NABP standards to operate online lawfully.

If a webpage has the VIPPS seal, it has been individually vetted by the NABP. A pharmacy must meet particular license requirements to get this seal. A certification team will also inspect the business to ensure that everything is working. Only then will they be awarded the VIPPS designation. You can buy medicines online safely if you know how to discover trusted internet businesses.

4. Failure to Read Customer Reviews

Check out a pharmacy’s reviews before buying medication from them for the first time. Customer reviews may be seen on the pharmacy’s Google My Business page. Visiting several websites will help you have a better understanding of the drugstore. Reviews may also be posted on the pharmacy’s website. These evaluations, on the other hand, are frequently cherry-picked. Instead, look for evaluations on third-party websites over which the online pharmacy has no influence. Are there any complaints made against the company? It’s hardly a significant red signal if there are one or two unfavorable reviews.

A high number of negative reviews, on the other hand, may suggest that the firm is untrustworthy. Reading online customer reviews can allow you to gain insight from others who have been in your shoes. You may learn from their mistakes by determining if they had a pleasant or poor purchasing experience. You can avoid fraud by reading these internet reviews. At the same time, you’ll be confident in the online store you select.

Several online vendors may give you sweet deals like “check here for an amazing discount on your first purchase.” However, if you aren’t aware of what constitutes a mistake and what does not, purchasing medical goods online can be a dangerous proposition.

What to Consider When Purchasing a Mechanical Keyboard for Gaming

Are you thinking of purchasing a mechanical keyboard? There are plenty of things you should note down before making a purchase. When it comes to mechanical keyboards, they are all the rage nowadays. This gadget was once a throwback piece of technology desired by the nostalgic and hardcore gamers, has now turned out to be one of the most costly, high-quality keyboard types you can find. But what should you consider when you are in the market looking for one to buy? Read on for more detailed information.

Understand the Terms and the Lingo

One of the most challenging parts of purchasing a mechanical keyboard for beste gaming tastatur is entire of the jargon from the suppliers to the fun. So if you are buying this gadget but don’t understand your “feels” from your store,” this is the perfect place to begin.

Feels

The feels will typically describe the physical switches used by the keyboards. Feels range from scissor switches to rubber dome to the ALPS, buckling springs, and Cherry MX. If you want high-end feels, it will help if you settle on top.

Switches

These are the mechanisms determining when you have pressed a key on your keyboard. This offers a palpable response while typing. Besides, it influences the sound produced and the pressure required to press down.

Know what you are using it for

Unlike the membrane-style keyboard or the typical scissor, mechanicals is typically sold with specific switches based on your purpose. For instance, specific switches need you to entire depress, or bottom out. Moreover, others have shorter travel distances for faster clicks.

When it comes to writers, they tend to opt for shorter travel distances, while punters prefer those that need to be fully depressed. It will help if you shop now from a reputable store that offers quality products.

Know the Best Quality

This requires proper homework or experimentation with preferably both. It is best to settle on the high-end switches. Avoid settling for cheaper models that cannot fulfill your needs. Are you looking for a backlit keyboard for the best gaming tastatur? A number pad? For what duration do you need it to last? These are some of the questions you are supposed to be asking before spending thousands of dollars on a keyboard.

Between the exclusive features and the quality of hardware, the cost of a keyboard is as maximum as a few dollars. Additionally, they have been designed for so many years. Therefore, you might be in a position of justifying the price if you are to buy it for that kind of person.

Consider the Leading Brands

It is best to remember that not all mechanical keyboards are made the same. Some use scissor-design switches, while others are cheaper membranes designed to emulate the sound, pressure, feedback of something like Topre or Cherry MX.

If you want to shop now for a genuine mechanical experience, you need to avoid unrecognized brands at all costs. The tips outlined here will make things easy for you when shopping for the right mechanical keyboard for gaming.

Bitcoin Mega-Faucet Cointiply Multifaucet for free

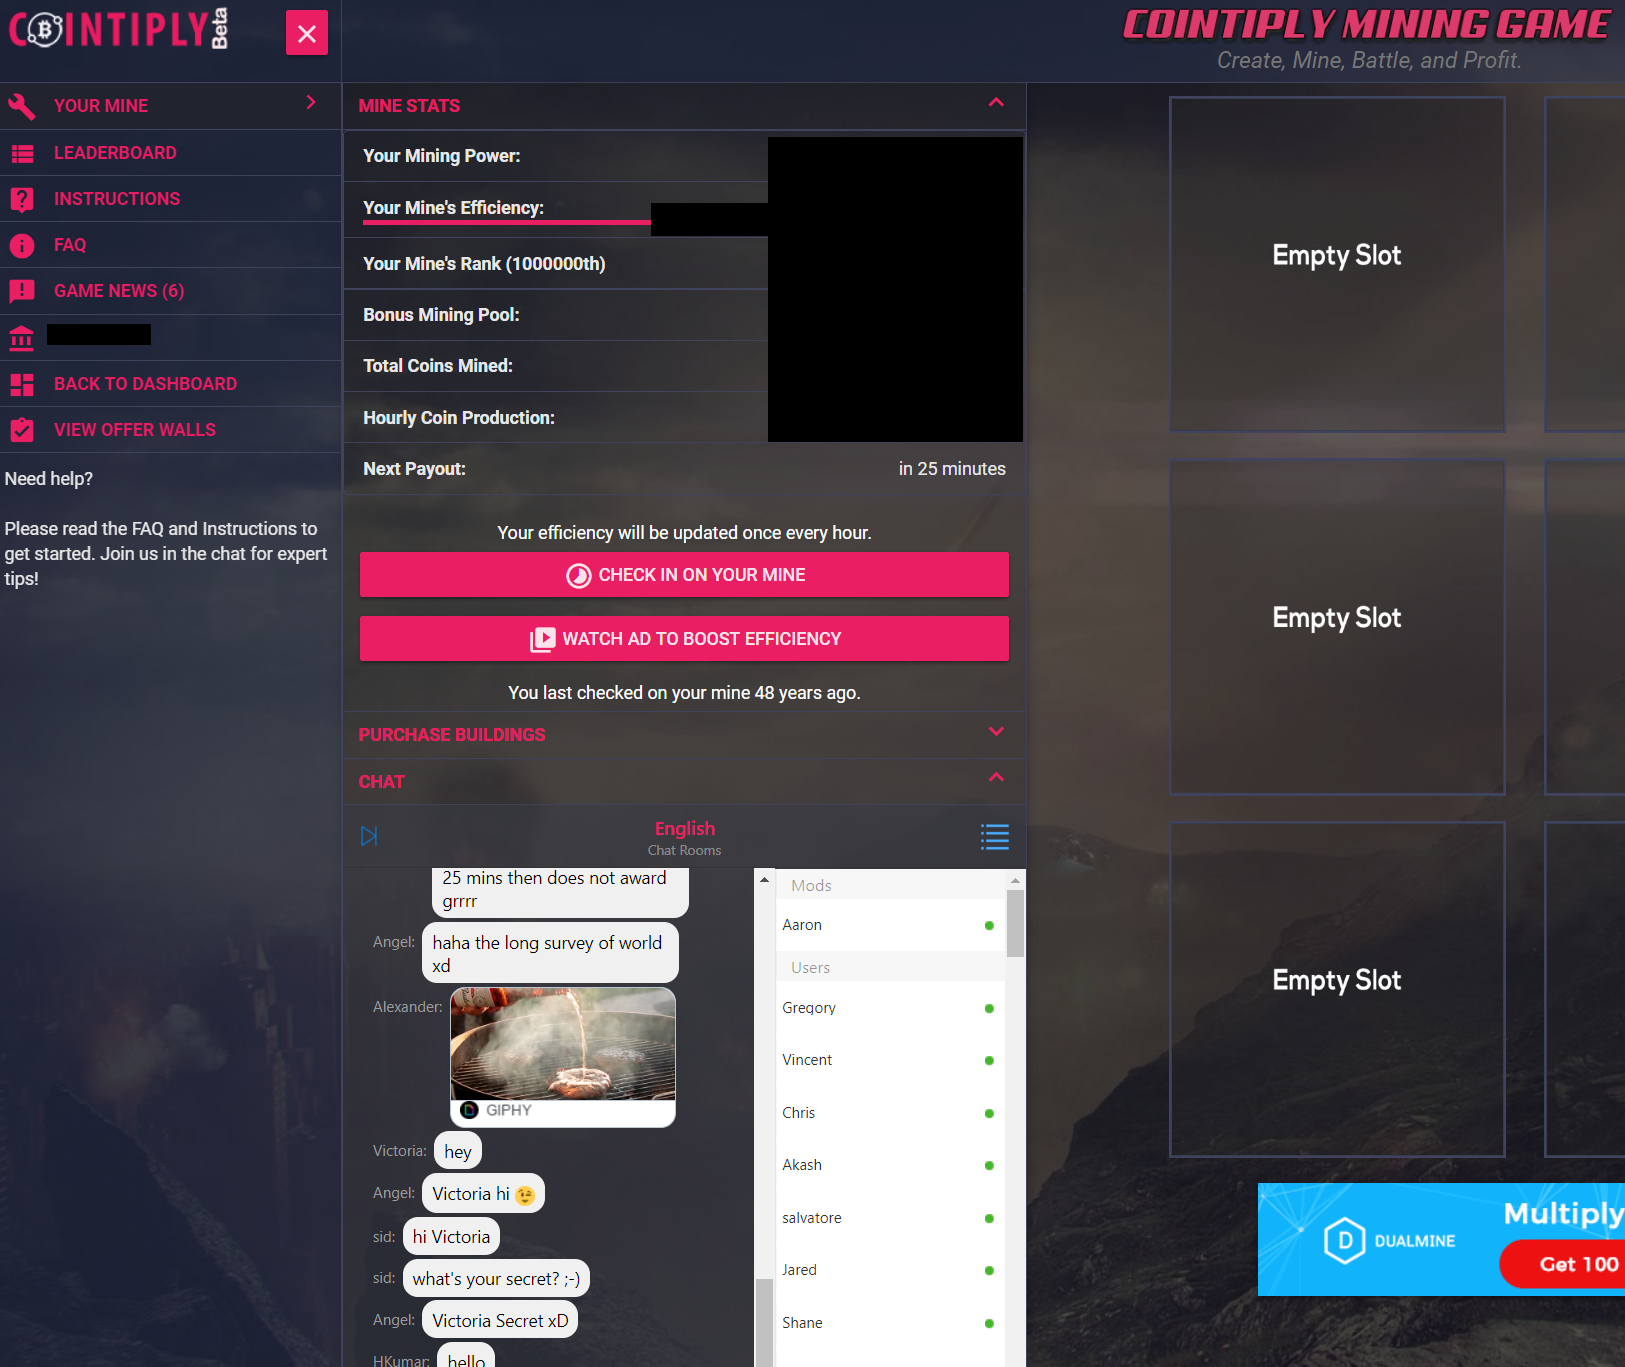
Today I want to introduce you one of my preferred Bitcoin faucets. The Cointiply faucet allows you to gain Bitcoins over different possibilities. You’ll get 100 Coins for registering on the page (which are round about 0,014 $).

As mentioned above, you can do many things to get Bitcoins for free.

Cointiply offers:

  • A faucet, which you can activate every 60 minutes. The faucet occurs as a spinning wheel, which you can spin onc e an hour. With a bit of luck you can win 57 extra coins and if you roll 99,999 you win another 100 coins.
    Cointiply Bitcoin-Wallet, die enorm Umsatz bringen kann.

    Cointiply Bitcoin-Wallet, die enorm Umsatz bringen kann (Screenshot aus mobiler Ansicht).

  • You can play a variety of games. With each played game you can earn 35 coins. Each game has its own goals to achieve. Every achievement can be done as many times as you want:


  • Third: Get Bitcoins for free while watching videos. As soosn as you achieved the videos goals, you gain the mentioned amount. For example you have to watch three video-adds. After these three adds you gain 51 coins:

  • A speciality of Cointiply is the so called ‘Offer wall’Here you’re offered some special tasks such as responding a questionaire, watching videos or fulfill surveys and so on… The income of every task is very high:

  • Then Cointiply gives you th possibility to mine some coins over mining games:

  • Last but not least you can advertise to increase your income. Up to now I dind’t tested it, so if someone can send me some information to publish them here it would be nice!

In general I can say, that this is one of the most worthwhile Bitcoin faucets i actually know. The more you do some extra work the more your income increases!

More working and reliable Faucets

Klick here for more working Bitcoin, Dogecoin, LiteCoin and Dash-Faucets

How to send REM from IDEX to MetaMask

First: HowTo setup MetaMask with MyEtherWallet.

If you wonder how to send your on IDEX purchased REMME (REM) to your MetaMask wallet, just follow these steps:

Add a new Token to your MetaMask wallet

  1. Add the Token to your wallet (just to display the amount, this is no ‘technical’ prerequisite!): Click in the Chrome Extension to ‘TOKEN>Add Token‘. (Keep in mind, that the token will only be displayed if you have balance into your account greater 0)
  2. Search for the required properties ‘Token Contract Address’, ‘Token Symbol’ and ‘Decimals of Precision’ at Etherscan Token Contract Search
  3. You’ll get the following:
    1. Contract Address: 0x83984d6142934bb535793A82ADB0a46EF0F66B6d
    2. Token Decimals: 4
    3. Token Symbol: REM (You’ll see that beside ‘Token Contract (ERC20)’)
  4. Paste these information into your Wallet, the new Token now is set

Copy your Ether-Address to send your amount (REM) to it

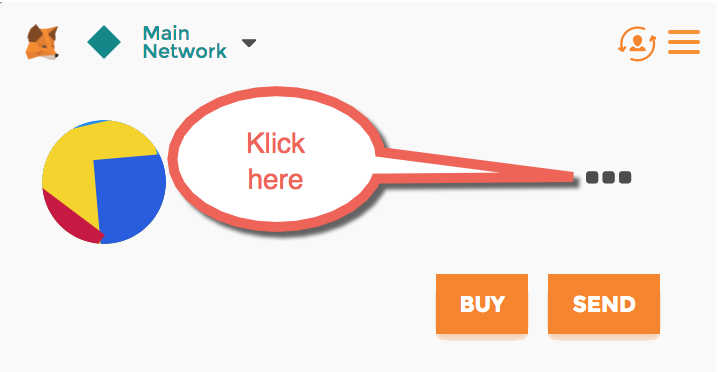
  1. Click on the three dots beside your Account name:

    How to send REMME (REM) to MetaMask

  2. Click on ‘Copy Address to Clipboard’
  3. Go to ‘Balances’ > ‘Full Balances’ in IDEX and klick on ‘Transfer’ and send your REM to the copied address

How to send cV from KuCoin to MetaMask

First: HowTo setup MetaMask with MyEtherWallet.

If you wonder how to send your on KuCoin purchased carVerticals (cV) to your MetaMask wallet, just follow these steps:

Add a new Token to your MetaMask wallet

  1. Add the Token to your wallet (just to display the amount, this is no ‘technical’ prerequisite!): Click in the Chrome Extension to ‘TOKEN>Add Token‘.
  2. Search for the required properties ‘Token Contract Address’, ‘Token Symbol’ and ‘Decimals of Precision’ at Etherscan Token Contract Search
  3. You’ll get the following:
    1. Contract Address: 0xda6cb58a0d0c01610a29c5a65c303e13e885887c
    2. Token Decimals: 18
    3. Token Symbol: cV (You’ll see that beside the amount ‘Total Supply’)
  4. Paste these information to your Wallet, the new Token now is set

Copy your Ether-Address to send your amount to it

  1. Click on the three dots beside your Account name:

    How to send carVertical (CV) to MetaMask

  2. Click on ‘Copy Address to Clipboard’
  3. Go to ‘Withdraw’ in KuCoin and send your cV to the copied address

Thanks to Grimvalo and mark_succerberg from reddit for this help!

Forgot password in Windows 8 is no problem!

Für die DEUTSCHE Version dieses Artikels folge diesem Link!

Forgetting your Windows password can be frustrating – don’t worry, it happens to the best of us!

While I’ve never forgotten my own password (or so I claim), we’ve all had our moments of forgetfulness. But let’s focus on solving your problem, not mine. 😅

If you’ve forgotten your Windows password on Windows 8 or 8.1, this step-by-step guide is here to help. In just 10 to 15 minutes, you’ll be able to reset your Windows password—even for the administrator account. No stress, no fuss, just an easy solution.

Read on to learn how to regain access to your Windows device and get back to what matters most!

Forgot password in Windows 8 (8.1) – Here’s What You Need to Know

Before diving into the step-by-step guide, here’s a quick overview of what we’ll be doing to reset your Windows password. To make this process work, we need access to the command prompt (CMD) before logging into the operating system. That’s where things get tricky.

On the standard Windows login screen, the command prompt isn’t readily available. You won’t find a button for it, and shortcuts like Windows + R won’t work either. But don’t worry—we’ll use a clever workaround to get access.

Using the Ease of Access Center to Reset Your Password

The key to resetting your Windows 8 password lies in utilizing the Ease of Access Center (found in the bottom-left corner of the login screen). Normally, this icon launches the utilman.exe utility. Here’s how we’ll turn it into a gateway to the command prompt:

  1. Replace utilman.exe with cmd.exe.
  2. Use the Ease of Access icon to open the command prompt directly from the login screen.
  3. Execute the necessary commands to reset your password.
  4. Restore the default configuration once the process is complete.

By following these steps, you can regain access to your system without compromising its integrity. Let’s dive into the process!

Getting Started: Accessing Repair Mode

To execute these steps, you’ll need to boot your system using either a Windows 8 USB boot stick or the original Windows installation DVD. Without one of these tools, accessing the required repair mode won’t be possible. An original Windows 8.1 Installation-DVD is easy to findon Amazon!

Here’s how to boot and access repair mode:

  1. Boot your system from the USB stick or DVD.
  2. On the Windows setup screen that appears, click Next in the bottom-right corner.
  3. Click Repair your computer in the bottom-left corner.
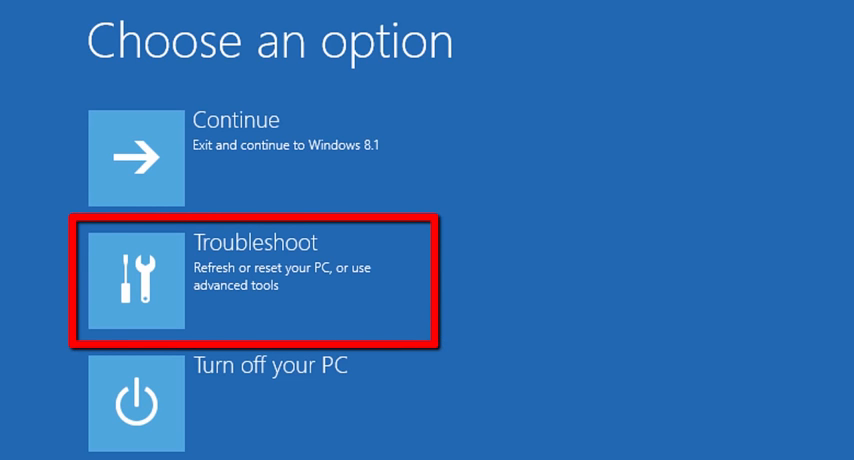
  4. On the next screen, select the middle option, labeled Troubleshoot.

Once you’ve entered repair mode, you’re ready to start resetting your password. Stay tuned for the detailed steps!

 Who forgot password should click here on trouble shoot to go ahead…

Who forgot password should click here on trouble shoot to go ahead…

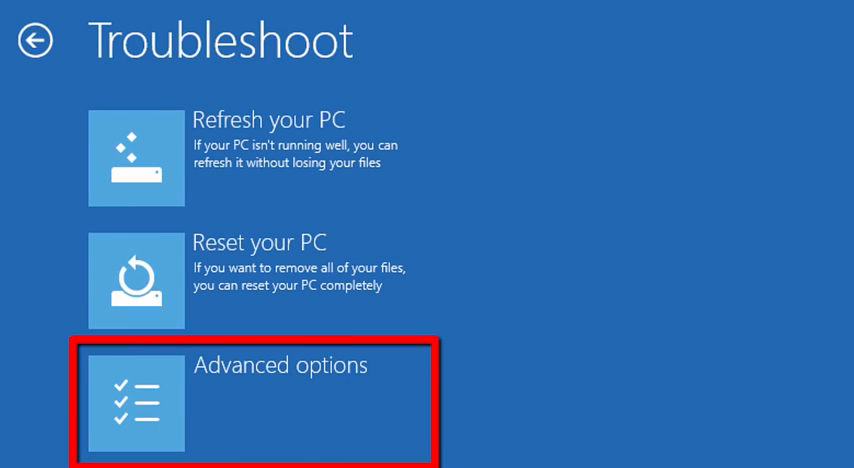
  • Please click here on Advanced Options:
 Who forgot password should click here on Advanced Options to go ahead…

Who forgot password should click here on Advanced Options to go ahead…

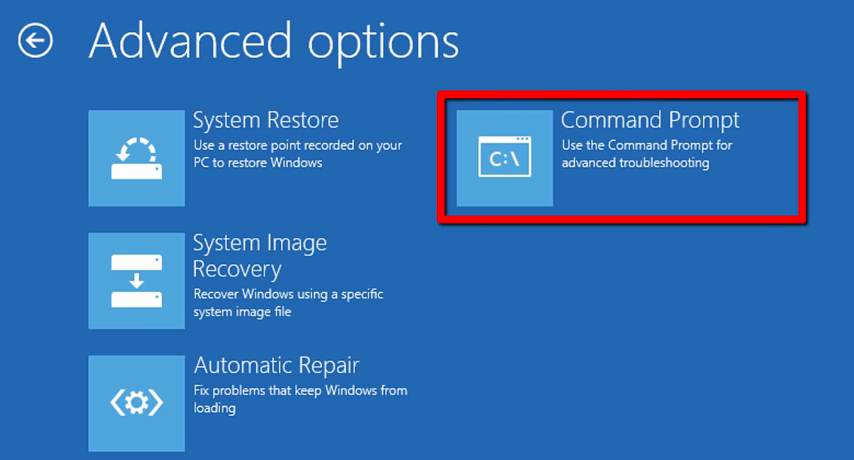
  • Now, please click on the right side the Command Promt:
 To realise this forgot password-HowTo, we need to open a Command Promt…

To realise this forgot password-HowTo, we need to open a Command Promt…

  • Now we copy the utilman.exe (this is the program-EXE for the Ease of Acces Center) to C:\ to save this file. For this we need the command:
    • copy c:\windows\system32\utilman.exe c:\
    • Was the copy process successful, the system lets you know this with a positive message
  • Then we copy the command line to the original place, where the utilman.exe normally lies. We overwrite the utilman.exe. Please write the following command:
    • copy c:\windows\system32\cmd.exe c:\windows\system32\utilman.exe
    • The question if the file should be overwritten can be confirmed positive with Y (= yes)
  • Reboot your PC now. Make sure that you have removed the Stick / DVD before
  • After rebooting your system you are on the login screen again. Klick at the bottom left on the Center for Ease of Access. See for this:
 This is the Windows 8.1-Icon for the Ease of Access Center. Here we transposed the utilman.exe wit the cmd.exe

This is the Windows 8.1-Icon for the Ease of Access Center. Here we substituted the utilman.exe with the cmd.exe!

Resetting Your Password Using the Command Prompt

If everything has been done correctly so far, you should now have access to the Command Prompt! Let’s proceed with resetting your password.

Step 1: Identify the Correct Account
It’s essential to reset the password for the right account. To list all accounts available on your Windows system, use the following command:

net user

Press Enter, and the command will display all existing user accounts.

Step 2: Reset the Password
Once you’ve identified the account, you can reset its password using the following command:

net user <username> <newPassword>

If the username contains spaces, enclose it in quotes. For example:

net user "test user" qwertz

Make sure to note that Windows will provide positive feedback if the command is successful.

Step 3: Activating the Administrator Account (If Needed)
If you’re resetting the password for the Administrator account, you must run an additional command to activate it:

net user Administrator /active:yes

Step 4: Final Steps
When you’re done, close the Command Prompt by typing exit or clicking the red “X” in the top-right corner. Then, reboot your system.

Step 5: Log In with Your New Password
After the reboot, you can log into your account using the newly set password. Congratulations—you’ve regained access to your Windows system!

Password Reset Complete – Final Steps to Roll Back Changes

Now that you’ve successfully reset your forgotten password, it’s important to revert the changes made earlier. Follow these steps to restore your system to its original state:

  1. Boot your PC again using either the USB boot stick or your Windows 8 installation DVD.
  2. Follow the same steps outlined at the beginning of this guide to access the Command Prompt.

By doing this, you’ll ensure the system remains secure and functions as intended. Let’s wrap things up!

By derogation of the commands from the beginning we have the following:

  • In command line write: move c:\utilman.exe c:\windows\system32\utilman.exe

Final Check After Resetting Your Password

Restart your system and test if the Ease of Access Center works as intended. Simply click on the icon at the login screen—it should no longer open the Command Prompt. Instead, it should launch the standard Ease of Access utility.

And that’s it! You’ve successfully completed this guide on resetting a forgotten Windows password. Congratulations!