
In this quick tutorial, I’ll show you how to create an iPhone ringtone from any sound file (for example from YouTube). In my example, I went over Dropbox as my preferred storage location, it works of course with Apple’s iCloud Drive, too

Here I show you how to create a ringtone for the iPhone without having to use iTunes. The path leads via Dropbox or iCloud Drive to the free Apple app “Garage Band”.
Requirements – what do I need for the ‘operation’?
- Search for a video or sound file, for example on YouTube. In my example, I link to the awesome video of the new Bosch IoT campaign</ strong> #LikeABosch
- Extract the sound. That’s legally fine. The information comes from a lawyer whose law firm specializes in media law. I refer you to a post I created a few days ago. There I explain how you can extract sounds from YouTube. The example was about free audio books for the Toniebox. The information about the lawyer and its video statement are also linked.
- You’ll need a Dropbox account or use iCloud Drive to put the soundfile in it.
- You also need the free Apple App “Garage Band“.
- Perhaps you like to shorten the mp3 or use a track from the middle. Then I recommend you to download the free tool mp3DirectCut (heise download).
iPhone ringtone creation HOW TO
Follow the instructions step by step, then the creation of the ringtone should not be an issue to you:
- Download your mp3 file – as in above mentionedstep 1 and step 2 into your Dropbox or in iCloud Drive
- Open the Garage Band App on your iPhone and click on the plus symbol in the upper right corner
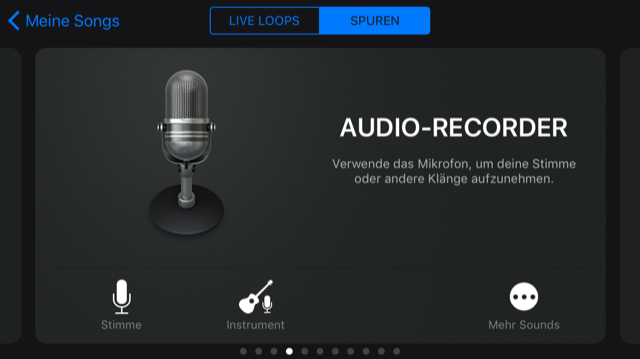
- Now click on the link “tracks” above and then scroll to the right until you arrive at the “AUDIO-RECORDER”. Click in the middle of the picture, preferably on the text”AUDIO-RECORDER“:
- Now go to the track view , you can get into that by clicking on the button in the upper left corner. It is the third button from the left:

- Now click on the ‘Loop’-symbol. This is a kind of looping in the upper right corner :)

- Now select the ‘File’ button in the middle of the file selection.
- Below you can now tap on ‘Browse objects in the Files app’.
- Search now the song either in the iCloud drive shown here or click the link top left ‘save locations’ over which you then get into the Dropbox. Select your song.
- Now the file is listed again and you can move it with your finger via ‘drag and drop’. The track view appears again. Move the song all the way to the top left on the first track.
- Now save the song by clicking on the triangle symbol in the upper left corner and select ‘My Songs‘
- The song (the track) is now saved. Once the stylized cloud-symbol in the icon has disappeared, the song is complete. Now click on it with your finger and pop up the context menu. Possibly you have to push a bit harder to achieve this.
- Now tap on ‘Share‘!
- Select in the middle ‘Ringtone‘.
- Give a name and press on the top right then on ‘export’.
- Now you have two options. If you select “Use sound as …”, you can set it as a “default ringtone”, as “standard message tone” or assign it to a contact. Or you just click OK, then the song will be saved in your Sound Library and you can change it at any time by going to your Settings > Sounds & Haptics > Ringtone (or message, new e-mail etc…).
A little tip, if you can’t select the Dropbox at the beginning, because it just will not be shown. Then you have to unlock it first. To do this, open the “Files” app (blue folder ![]() ) and click on “Edit” in the upper right corner and activate Dropbox in it.
) and click on “Edit” in the upper right corner and activate Dropbox in it.
That’s it :)
Thank you so much, great post.
Great post, thank you so much.
brilliant post, loving my new ringtone, thank you!